
Items
Create items with a model or icon, author how equipment sits on the character, capture inventory icons, set stats and options, and read the items.json schema.
10 min read
What an item is#
An item is anything that can sit in a player's inventory: a sword, a potion, a key, a stack of coins. Every item has a numeric item_id, a name, an inventory icon, and a set of right-click Interaction Options. An equippable item also has an equipment slot, a 3D model, a placement on the character, combat stats and level requirements.
Items are defined once in the Data Editor and referenced everywhere else by id: drop tables, shops, recipes, tasks and scripts.
Create an item#
- In the Data Editor, open the Items tab and click + New Item, or click the Items card on the Create New page.
- Give it a model or an icon:
- Drop a mesh (
.glb,.gltf,.fbx,.obj) on the card, drag one from the model shelf, or click the attach zone to browse. A freshly dropped model goes through the Import Model screen first (name, category, texture cap, bake). - Drop a
.png/.jpg/.webpinstead to make an icon-only item. The page shows the image at 64, 48 and 32 pixels and assumes the item is an inventory item (not equippable). - Or attach nothing. The item defaults to a plain inventory item and you can add an icon later.
- Drop a mesh (
- Type a Name and leave the ID on
(next)unless you are filling a gap. - With a model attached, choose the item type using the slot bar across the top of the 3D preview: Inventory Item Only, or one of Right Hand, Left Hand, Head, Body, Hands, Legs, Boots, Amulet, Ring. A dragged mesh starts on Right Hand; a model from the cloud library starts on the slot its category implies.
- Optionally pick a template under Start from a template or copy fields from Existing:.
- Press Finalize Item. The model is imported, the item opens in a tab, and it auto-saves once the icon snapshot has been captured.
Author equipment in the viewport#
When an equipment slot is selected on the create page, the preview shows a faint ghost of the player character with your model on it. This is where you decide how the item equips and where it sits.
- Equip Mode (dropdown in the bottom-left corner of the viewport) appears for slots with more than one mode. Modes are of three kinds:
| Kind | Meaning | Slots that offer it |
|---|---|---|
| Attach | The model hangs rigidly off one bone of the rig. Right for weapons, shields, necklaces, hats. | Right Hand, Left Hand, Head, Amulet |
| Replace | The model stands in for a body part, which stops rendering. The model is auto-rigged to the rig's weights. | Head, Body, Hands, Legs, Boots |
| Overlay | Like Replace, but the body part keeps rendering underneath. Use it for garments that must not hide skin. | Head, Body, Legs |
The full list of modes and the bones they use is in the reference table at the end of this page. Ring has no predefined mode; it previews attached to the right hand and you can change the bone in the item editor.
- Move / Rotate / Scale tools (top-right of the viewport) turn the left mouse button into a transform gizmo on the item: drag the red/green/blue arrows to move along an axis, drag a colored ring to rotate, drag an axis handle or the white center to scale. Right-drag still pivots the camera, middle-drag pans, and the wheel zooms. The same values are editable as spinboxes in the Placement on Character section under the viewport; a lock button keeps the scale uniform.
- For attach modes the ghost plays the character's idle animation so the item sits exactly as it will in game; the Animation Pose toggle switches to the rest pose, and Character Meshes shows the real character materials instead of the ghost.
- For Replace and Overlay modes the section is called Rig to Character: line the model up over the highlighted body part (Auto Fit scales and positions it to that part's bounds), press Auto Rig to transfer skin weights, and tick Test Pose to bend the skeleton and check the mesh deforms with the body. Spread moves each half of a paired model (boots, gloves) apart along X. Reset All restores position, rotation, scale and spread.
- Choosing Inventory Item Only switches the preview to icon mode: orbit the model to the angle you like and press Create Snapshot to capture the 64/48/32 inventory icons. Finalize carries them into the item.
Base pose and delta edits#
The placement you author on the create page becomes the item's base pose. In the item editor, the Scale, Position and Rotation spinboxes next to the viewport are deltas on top of that base: a freshly finalized item reads all zeros and ones, and every later tweak moves the model relative to the pose you previewed. The composed final transform is what ships to the client, so an item created before this behavior existed simply has an identity base and its spinboxes are the absolute values they always were.
The item editor#
An open item shows a left panel with the visual setup and a right panel with name, script and three tabs.
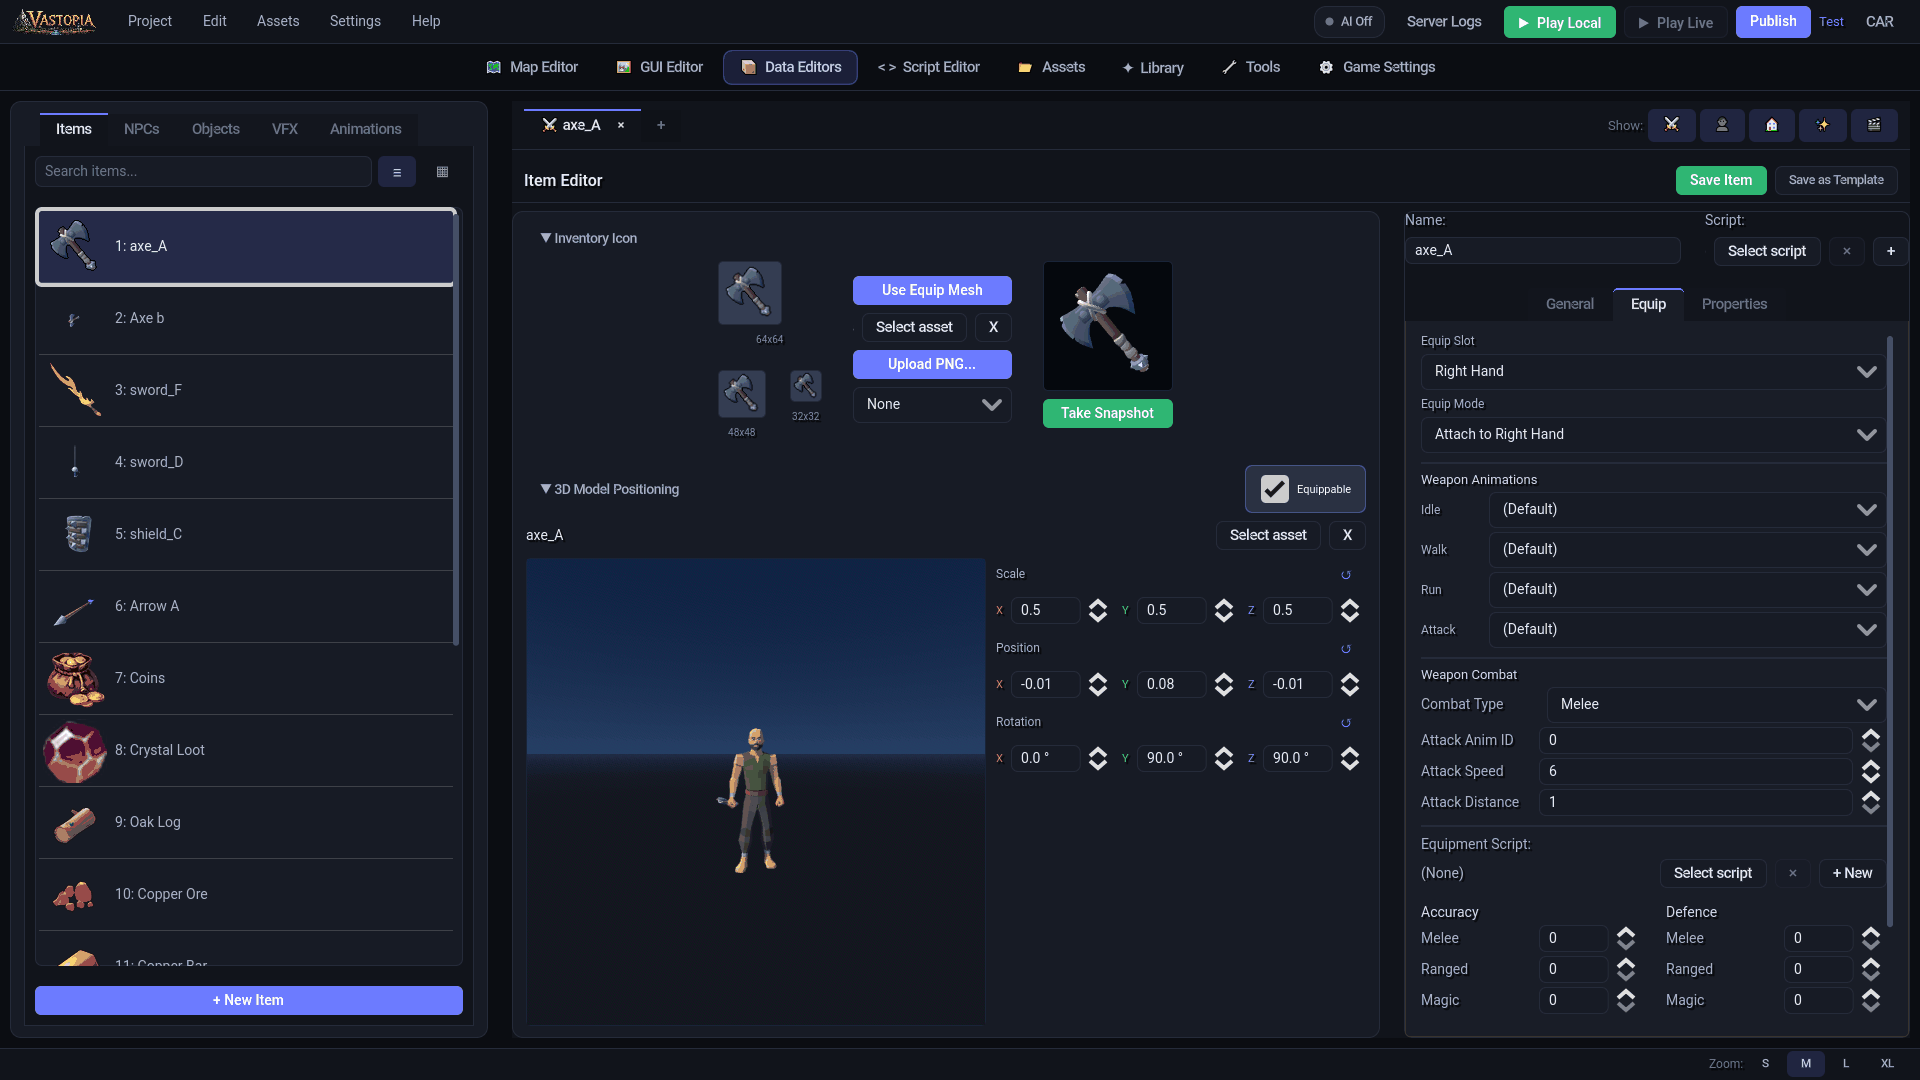
Left panel: Inventory Icon#
Every item must have an icon before it can be saved. The collapsible Inventory Icon section offers three sources:
- Use Equip Mesh - renders the equipped model into the icon viewport. When a model is first assigned to an item that has no icon yet, this happens automatically.
- The icon mesh picker - choose a different model from the asset library to render as the icon, independent of the equipped mesh.
- Upload PNG... - use an image file directly. The original artwork is also imported into the Asset Library tagged as an item icon.
For rendered icons, orbit the model in the icon viewport and press Take Snapshot whenever you want a new angle. The outline dropdown applies None, Default (Black), one of your saved presets, or Custom..., which opens an editor with Outline Color, Shadow (right + bottom), Shadow Color, and Save Preset. Presets are stored in outline_presets.json at the project root. The three previews show the exact 64x64, 48x48 and 32x32 pixels that will ship.
Icons are written on save to assets/icons/64/<item_id>.png, assets/icons/48/<item_id>.png and assets/icons/32/<item_id>.png. Nothing is written while you experiment.
Left panel: 3D Model Positioning#
The Equippable checkbox makes the item equipment and reveals the Equip tab on the right. Below it, the mesh picker selects the equipped model from the asset library, the viewport shows it on the character (left-drag orbits, right-drag pivots, middle-drag pans, wheel zooms), and the Scale, Position and Rotation spinboxes (with a reset arrow per group) adjust the delta described above.
Right panel: Name and Script#
Name is the display name. Script binds a server script from server/scripts/items/ that runs when the item is used or interacted with; the + button creates one. See NPC, object and interaction scripts.
General tab: Interaction Options#
The right-click menu players see on the item. Use and Drop are always present and cannot be removed; custom options are inserted above Use and Drop is pinned to the bottom. Add Eat or Drink from the dropdown, or type a label in Custom... and press Enter - the id is the label lowercased with spaces and dashes turned into _. Each row has a drag handle to reorder, an Edit Method button that creates or opens the script method for that option, and a remove button.
The Drop row has a mode dropdown: Drop puts the item on the floor for anyone to pick up; Destroy makes the server remove it outright (quest items, keys) even if a client sends a plain drop.
Equip tab#
Shown only when the item is equippable.
| Field | Notes |
|---|---|
| Equip Slot | One of the nine slots. Changing it repopulates the modes. |
| Equip Mode | The attach/replace/overlay mode for that slot. |
| Attach Bone | Shown for slots without predefined modes (Ring): the rig bone the mesh is parented to. |
| Weapon Animations (Right Hand only) | Idle, Walk, Run, Attack overrides chosen from the humanoid animation base; (Default) keeps the character's normal clip. |
| Weapon Combat (Right Hand only) | Combat Type (Melee, Ranged, Magic), Attack Anim ID, Attack Speed (default 6), Attack Distance (default 1). Hit GFX ID and Projectile ID appear for Ranged and Magic and reference VFX ids. |
| Equipment Script | A script from server/scripts/equipment/ bound to the worn item; + New creates one. |
| Accuracy, Strength, Defence | Melee / Ranged / Magic values, 0-9999 each. |
| Requirements | + Add Requirement adds a skill (from your skills_config.json) and a Lv. the player must reach to equip. |
Equipment stats ship to both files: the server uses them in combat and the client sums worn items for the equipment screen.
Properties tab#
- Description - free text shown to players.
- Stackable - off by default. On, every unit merges into one inventory slot (coins, arrows).
- Tradeable - on by default. Off, the trade screen refuses the item.
- Droppable - on by default. Off, the server refuses both Drop and Destroy.
- Custom properties from the manifest (
valueandweightin a new project) and + Add Property.
Reference: equip modes#
| Slot | Mode id | Label | Kind | Bone / parts |
|---|---|---|---|---|
| right_hand | attach_right_hand | Attach to Right Hand | attach | DEF-hand.R |
| left_hand | attach_left_hand | Attach to Left Hand | attach | DEF-hand.L |
| head | replace_head | Replace Head | replace | head |
| head | replace_head_jaw | Replace Head + Face | replace | head, jaw |
| head | overlay_head | Render on Top of Head | overlay | head |
| head | overlay_head_jaw | Render on Top of Head + Face | overlay | head, jaw |
| head | attach_head | Attach to Head (Bone) | attach | DEF-spine.006 |
| body | replace_body | Replace Body | replace | chest |
| body | replace_body_arms | Replace Body + Arms | replace | chest, arms |
| body | overlay_body | Render on Top of Body | overlay | chest |
| body | overlay_body_arms | Render on Top of Body + Arms | overlay | chest, arms |
| hands | replace_hands | Replace Hands | replace | hands |
| legs | replace_legs | Replace Legs | replace | legs |
| legs | overlay_legs | Render on Top of Legs | overlay | legs |
| boots | replace_boots | Replace Boots | replace | feet |
| amulet | attach_neck | Attach to Neck | attach | DEF-spine.004 |
| ring | - | (manual attach bone) | attach | chosen in Attach Bone |
Bone names are those of the player rig (a Rigify DEF-* skeleton).
Reference: items.json#
Client - assets/data/items.json#
| Field | Type | Notes |
|---|---|---|
item_id | int | Identity. |
name, description | string | Display text. |
is_equippable | bool | |
slot | string | Slot key, or "". |
equip_mode | string | Mode id from the table above, or "". |
attach_bone | string | Only for manual-bone modes. |
model_asset_id, model_path | string | Equipped model (asset id and res://assets/... path). |
icon_mesh_asset_id, icon_mesh_path | string | Model rendered for the icon. |
icon_path, icon_path_48, icon_path_32 | string | assets/icons/<size>/<item_id>.png. |
editor_properties | object | editor_position/rotation/scale (composed final transform the client applies), equip_base_* (the authored base pose), and icon camera state (icon_orbit_*, icon_model_rotation). |
interact_options | string[] | Option labels only. |
weapon_animation_overrides | object | idle, walk, run, attack animation ids. |
equipment_stats | object | Same integers as the server copy, for display. |
Server - server/data/items.json#
| Field | Type | Notes |
|---|---|---|
item_id, name, is_equippable, slot, equip_mode, attach_bone | As above. | |
stackable | bool | Default false for new items. |
tradeable | bool | Default true. |
droppable | bool | Default true. |
interact_options | object[] | {id, label, script_path}; the drop option also carries drop_mode (drop or destroy). |
script_path | string | Project-relative item script. |
equipment_script_path | string | Project-relative equipment script. |
equipment_stats | object | accuracy_*, strength_*, defence_* for melee/ranged/magic; combat_type (0 Melee, 1 Ranged, 2 Magic); attack_anim_id; hit_gfx_id; projectile_id; attack_speed; attack_distance. |
requirements | object[] | {skill, level}. |
weapon_animation_overrides | object | Integer animation ids. |
properties | object | Custom manifest property overrides. |
With AI (MCP)#
create_item writes both files, allocates the id, and - when given a model_asset_id - renders the inventory icon from the model automatically (auto_icon: false skips it). update_item changes only the fields you pass. render_item_icon re-renders an existing item's icon from its model with a different framing; generate_item_icon draws a procedural icon for items that have no model. list_items and get_item read definitions back.