Terrain
Sculpt the ground, paint and manage terrain textures, cut holes, grow the terrain with regions, and set up water, sky and lighting for a map.
9 min read
What Terrain mode does#
Terrain is the first of the three edit modes (top-right Edit: toggle, default key F1). It owns the ground itself: the Terrain3D height surface, the textures painted onto it, holes, the active region cells, and the height-layer brushes described in Height layers. While you are in Terrain mode the viewport hides every placed prop, object and marker so nothing gets between you and the ground; switch to Objects or Region when you want them back.
The mode has three working surfaces:
- The tool column down the right edge of the viewport, between the 3D view and the right panel. Hover any tool for its name and current shortcut.
- The brush settings bar along the bottom, which changes with the tool.
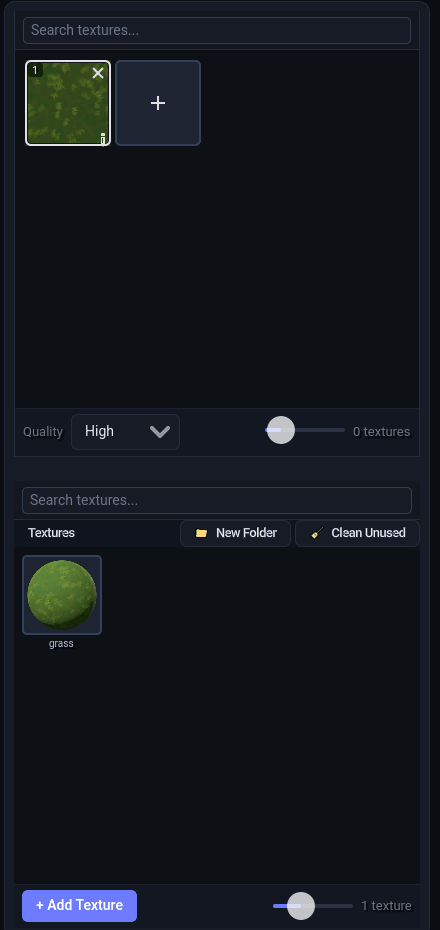
- The right panel's Textures tab, with the Library panel docked beneath it.
Map-wide settings (sky, lighting, fog, water, terrain mesh quality) live in the left panel's Nodes tree and Inspector.
Sculpting#
Tools#
| Tool | Default key | What it does |
|---|---|---|
| Raise / Lower | R | Pushes the ground up under the brush; the Lower half of the button (or holding Ctrl) pushes it down |
| Smooth | Z | Averages heights under the brush. Holding Shift with any sculpt tool also smooths |
| Height | H | Flattens the ground toward the Height value. Ctrl+click samples the height under the cursor into that value |
| Slope | X | Paints a gradient between two points you pick (the Points picker), optionally as a drawable stroke |
| Add Region / Remove Region | G | Click to activate a region cell, Ctrl+click to remove one. See "Terrain regions" below |
Tool keys are plain letters with no modifier and are rebindable under Settings > Keybinds in the Terrain Tools group.
Brush settings#
The bar below the viewport shows the settings the armed tool uses. These are the shared Terrain3D brush settings; the height-layer tools use the same ones.
| Setting | Default | Range | Notes |
|---|---|---|---|
| Brush shape | first image | A row of brush images (circle and falloff variants); click to choose | |
| Size | 20 m | 1 to 200 m | Brush diameter. The engine never paints smaller than 2 m, so a 1 m sculpt brush still affects a 2 m area |
| Strength | 33 % | 1 to 100 % | How much each application moves the ground |
| Height | 20 m | -100 to 100 m (slider -50 to 50) | Target for the Height tool; the picker button samples it from the terrain |
| Invert | off | Touchscreen only: stands in for holding Ctrl |
Click a setting's label to reset it to its default. The bar also has an advanced submenu with Add regions while sculpting (on), Align to view (on), Show cursor while painting (on), Gamma (1.0), Jitter (50 %) and Crosshair threshold (16 m).
Procedure: shape a hill and flatten a plateau#
- Switch to Terrain mode and press
Rfor Raise. - Set Size to the width of the hill and Strength to taste, then click-drag over the ground. Hold
Ctrlto lower instead. - Hold
Shiftand stroke again to smooth the result. - Press
Hfor Height,Ctrl+click the spot whose height you want to keep, then paint the area you want level. The center of the brush snaps to the value; the edges blend. - Press
Ctrl+Zif a stroke went wrong. Each sculpt operation is one undo step, and the last 20 terrain snapshots are kept.
Texture painting#
The Textures tab#
In Terrain mode the right panel shows the map's texture slots. Each tile carries a numbered badge (slot 1 upward); up to 32 slots fit on a map. A slot with a texture can be selected by clicking it or by pressing its number key 1 to 9 while a texture brush is armed, and the texture currently being painted is previewed in a small overlay at the bottom-right of the viewport.
| Action | How |
|---|---|
| Add a library texture to the map | Drag it from the Library panel onto the Textures tab, or right-click it and choose Add to Map |
| Replace a slot | Drag a library texture onto that slot |
| Swap two slots | Drag one slot's tile onto another |
| Edit a slot's material | Click the slot's Edit Asset button to open the Texture window |
| Change per-map texture resolution | The Quality picker in the Textures footer: Low (128 px), Medium (256 px) or High (1024 px, the default). Every texture in the map is rescaled to the chosen size |
The Texture window shows the Albedo Texture and Normal Texture side by side and the material values beneath them: Name, Albedo Color, Normal Depth, AO Strength, Roughness, UV Scale, Vertical Projection, Detiling Rotation and Detiling Shift. OK applies, Cancel discards.
The texture Library#
The Library panel under the Textures tab is the project's texture library (stored at assets/textures/, shared by every map in the project). It has a search box, folder breadcrumbs ending in New Folder and Clean Unused, a thumbnail grid, and a footer with + Add Texture and a thumbnail size slider.
To add a texture, press + Add Texture or drop image files straight onto the grid. The Add Texture dialog has a Name field and two drop slots, Albedo and Normal (optional); drop a whole PBR set (color, normal, roughness, height) and it is packed automatically. Right-click a library tile for Add to Map, Edit Defaults..., Rename, Move to Root and Delete from Library; right-click a folder for Open, New Subfolder, Rename Folder and Delete Folder. Clean Unused deletes texture files under assets/textures/files/ that no map or the library still references.
Paint and spray#
| Tool | Default key | What it does |
|---|---|---|
| Paint Texture | C | Replaces the texture under the brush with the selected slot |
| Spray Texture | V | Blends the selected texture in gradually; Strength controls how fast, Ctrl blends it back out |
Both show the brush shape and Size plus a Texture on/off checkbox, a Slope range (0 to 90 degrees) that limits painting to ground within that steepness, and Angle and Scale controls (with pickers, and Dynamic angle) for rotating and resizing the texture tiling as you paint.
Autoshader#
Paint Autoshader (U) marks areas where the terrain textures itself automatically by slope and height, using two slots: a base for flat ground and an overlay for steep ground. The Disable Autoshader half of the button (or Ctrl) hands an area back to manual painting. The slots and the map-wide switch are in the Terrain3D inspector under Autoshader: Enabled, Base Texture (slot index, default 0) and Overlay Texture (default 1). A map created with an Autoshader texture on the create screen starts with this switched on.
Holes#
Add Holes (O) cuts the terrain mesh away under the brush so you can see through it; the Remove Holes half of the button (or Ctrl) fills it back in. A hole removes every face touching the carved vertices, so the visible opening is slightly larger than the brush. The brush decal turns black while the tool is armed.
Terrain regions#
Terrain only exists inside active region cells, each 64 x 64 tiles (32 world units); see the overview for how they relate to tile coordinates. The Add Region tool (G) shows the instruction "Click the terrain to add a region. CTRL+Click to remove." in place of brush settings: click an empty cell to activate it, Ctrl+click an active cell to delete it and everything painted in it. With Add regions while sculpting on (the default), sculpting off the edge of the terrain activates cells as you go.
The Terrain3D inspector's Info section shows how many regions the map has. Turn on View Region Grid and View Region Labels in the View menu to see cell edges and coordinates.
Map environment#
Select a node in the left panel's Nodes tree to edit it in the Inspector below. The + button next to the tree adds a DirectionalLight3D if the map has none.
Terrain3D#
| Section | Controls |
|---|---|
| Info | Regions count |
| Background | Type: None, Flat, Noise or Water (what fills the space beyond the terrain) |
| Mesh | LOD Levels (1 to 8, default 7), Mesh Size (8 to 64, default 48), Vertex Spacing (read-only, 0.5) |
| Material | Blend Sharpness (how hard texture edges blend), Tex Filtering (Linear or Nearest) |
| Autoshader | Enabled, Base Texture, Overlay Texture |
Water#
Choosing Water as the background type turns on the map's water plane. It sits at the waterline (just below 0 on the Y axis by default, where Island maps put the sea) and is saved to the map's water.json together with its colours and surface values: enabled, level, water_color, deep_color, highlight_color, fresnel_power, highlight_strength, roughness and metallic. The water level and colours are not exposed in the inspector; set them with the set_water MCP tool described below.
WorldEnvironment#
| Section | Controls |
|---|---|
| Sky | Top Color, Horizon, Ground (shown when the map uses a procedural sky, which every created map does) |
| Ambient Light | Color, Energy (0 to 5), Tonemap: Linear, Reinhard, Filmic or ACES |
| Fog | Enabled, Color, Density (0 to 1) |
| Glow | Enabled, Intensity (0 to 5) |
DirectionalLight3D#
| Section | Controls |
|---|---|
| Visible | Show or hide the sun |
| Light | Color, Energy (0 to 10) |
| Rotation (degrees) | X (Pitch) -90 to 90, Y (Yaw) and Z (Roll) -180 to 180 |
| Shadows | Enabled, Opacity (0 to 1) |
View Environment in the View menu hides the environment and sun while you work without changing them. The lighting theme chosen at creation (Default, Sunset, Night, Overcast, Dawn, Dungeon, or a project .tres template) is only the starting point for these values.
With AI (MCP)#
Terrain can be generated and shaped without the editor, on a working heightfield that is committed with a bake:
| Tool | Purpose |
|---|---|
generate_terrain | Builds the working heightfield from an ordered op-stack: noise presets (plains, rolling_hills, mountains, eroded, plateau), mask, stamp (hill, mountain, mountain range, crater, ridge, mesa), erosion, carve_river, carve_path, auto_rivers, biome and paint_terrain_material. Centered on the origin by default |
sculpt_terrain | Brush ops (raise, lower, flatten, smooth, ramp, plateau) over a tile region |
apply_erosion | A hydraulic or thermal erosion pass with an intensity from 0 to 1 (default 0.5) |
paint_terrain_material | Assigns grass, rock, sand, snow, dirt or water where a height, slope or region selector matches |
bake_terrain | Commits the heightfield: recomputes walkability from slope (ceiling_deg, default 45), rewrites the server walkability file and exports the heightmap and control map, which a running editor imports over the bridge or the editor imports the next time the map is opened |
read_terrain, sample_terrain, query_terrain_region | Read back walkability, active regions, height-layer offsets and water level as text (the sculpted ground height itself lives in Terrain3D files the tools cannot read) |
set_water | Enables the water plane and sets its level and colours in water.json |
activate_map_regions | Activates region cells so a map can grow beyond its starting 2 x 2 |
Every one that writes accepts dryRun: true to preview the result without changing anything; the read-only tools (read_terrain, sample_terrain, query_terrain_region) take no such argument.