
Regions and Elements
Place NPC spawners, edit interactive objects, paint locations and walkability flags, and manage the elements a map sends to the server.
11 min read
What region elements are#
Everything on a map that the server needs to know about is a region element: an NPC spawn point, an interactive object a player can click, a named location with its own fog and audio, a trigger zone, or a tile that players are not allowed to walk on. None of these are plain scenery. Props and painted meshes (see Props and model painting) are drawn by the client and ignored by the server; region elements are exported to server/data/maps/ on every save and drive spawning, interaction and pathfinding in the live game.
Region elements live in one file per map, maps/<name>/regions.json, with four arrays: npc_spawners, interactable_objects, location_bounds and trigger_zones. Saving the map also rewrites the server extracts server/data/maps/npc_spawns/<map>.json, object_spawns/<map>.json, location_bounds/<map>.json and the walkability file flag_data/<map>.terrain. See Map files and export for the formats.
Region mode#
The edit-mode toggle in the top-right corner of the viewport has three buttons: Terrain, Objects and Region (default shortcuts F1, F2, F3, rebindable in Settings > Keybinds). Region mode is for the parts of the map players never see directly. Anything with a model - props, painted scenery, interactive objects, buildings - is placed in Objects mode, but interactive objects remain region elements, so you can still select and edit them here.
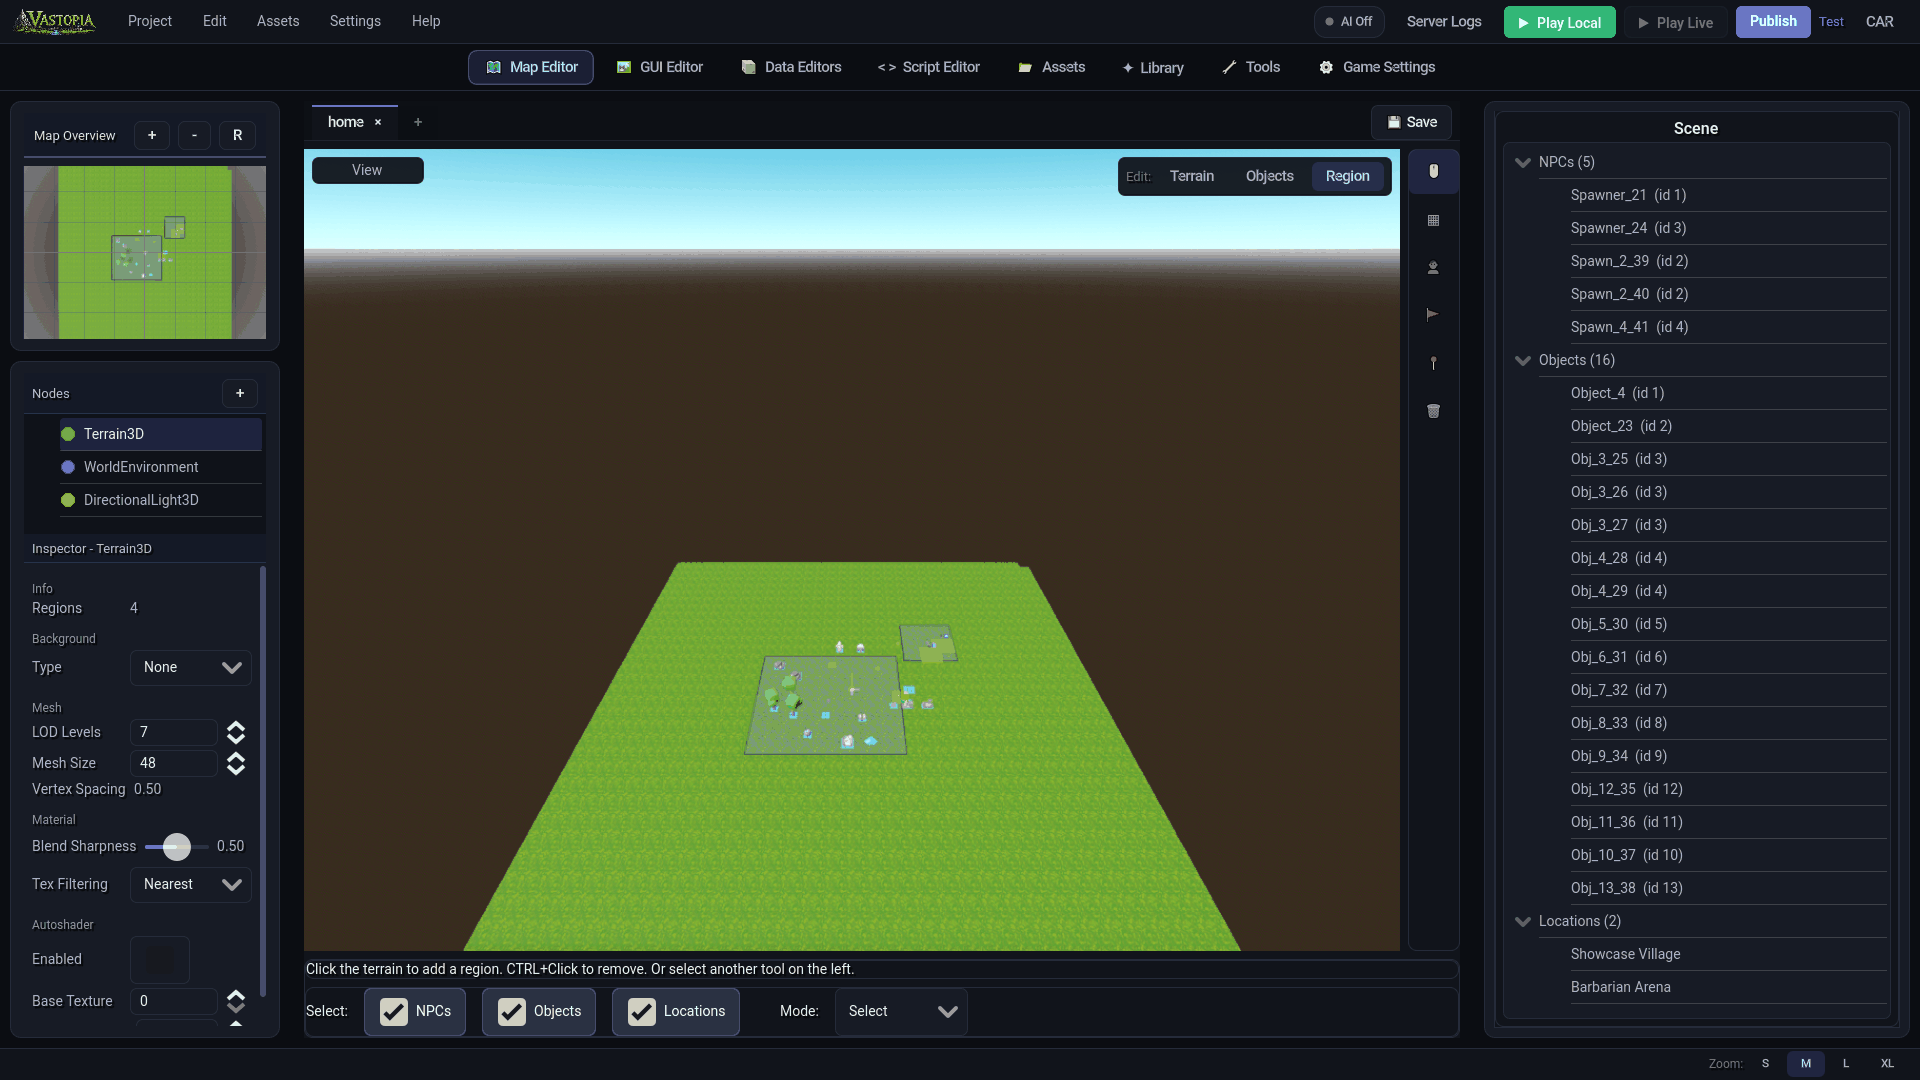
Switching to Region mode replaces the terrain tool column with a vertical toolbar on the right edge of the viewport:
| Tool | What it does | Right panel |
|---|---|---|
| Select Entity | Click an element to select it and open its properties. | Scene tree |
| Select Tiles | Drag a tile rectangle to delete, copy or paste everything inside it. | Selection tab |
| Place NPC | Pick an NPC, then click the map to drop a spawner. | NPCs tab |
| Paint Flags | Brush tiles unwalkable or walkable. | Flags tab |
| Paint Location | Drag rectangles of tiles and assign them to a named location. | Locations tab |
| Delete Element | Click an element to remove it. | Scene tree |
The right panel changes with the tool, and a footer under the viewport shows the tool's settings. With Select Entity the footer offers Select: filters (NPCs, Objects, Locations) and a Mode: dropdown (Select or Insta-Delete). With every other tool it shows Height Layer:, Brush Size: (1-50), Brush Shape: and the Paint: Unwalkable / Paint: Walkable toggle.
The View menu (top-left of the viewport) has View NPCs, View Objects, View Flags and View Locations toggles if you need to hide a category while you work.
NPC spawners#
An NPC spawner marks where an NPC definition from the Data Editor appears in the world. The spawner stores only placement decisions: which NPC, where, which way it faces, whether it wanders, and its respawn time. The model, size and animations come from the NPC definition and are refreshed every time the map loads, so editing the NPC in the Data Editor updates every spawner that uses it.
Place a spawner#
- Choose Region mode and press Place NPC.
- In the NPCs tab, find the NPC (there is a search box and List / Grid views) and click it. A translucent preview of the model follows your cursor, with a yellow footprint showing the tiles it occupies. NPCs bigger than one tile anchor at their south-west tile and extend east and north.
- Before clicking, set the spawn options in the Spawn Properties panel below the list:
- Respawn with a time in seconds (default
60, up to3600). - Wanders with a radius in tiles (default
3, up to20) and an intensity of Low, Medium or High.
- Respawn with a time in seconds (default
- Rotate the preview with
E(clockwise) andQ(counter-clockwise). NPCs face one of eight directions in 45-degree steps. The placement overlay in the corner of the viewport shows the NPC's id and name and the tile under the cursor. - Click the terrain (or the active height layer) to place. Keep clicking to place more copies.
A placed spawner shows overhead icons for wandering and respawning, and a green tile halo for its wander radius while selected.
Edit a spawner#
Press Select Entity and click the spawner, or pick it from the Scene tree, which lists every element under NPCs, Objects and Locations with its definition id. The Spawn Properties panel shows its Name, ID, Size, Tile, the Respawn and Wanders settings, a Delete button and Open in Data Editor to jump to the NPC definition. To swap the spawner for a different NPC without moving it, pick the new NPC in the list and press Replace.
How the server uses spawner fields#
| Field | Editor control | Effect in game |
|---|---|---|
npc_id | NPC list | Which NPC definition spawns. |
rotation_y | Q / E while placing | Facing in degrees (0 = north, 90 = east). |
behavior | Wanders checkbox | idle NPCs stand still; wander and patrol NPCs are allowed to move. |
spawn_radius | Wanders radius | How far (in tiles) a wandering NPC roams from its spawn tile. |
wander_intensity | Low / Medium / High | How often the NPC picks a new destination: roughly every 6-12 s, 2-6 s or 0.5-2 s. |
respawn_time | Respawn seconds | Written to the spawn file; 0 when respawn is off. |
height_layer_id | Height Layer footer dropdown | The floor the NPC stands on. |
spawn_count, patrol_path, spawn_condition | No editor control | Saved and exported, defaulting to 1, empty and empty. |
Interactive objects#
An interactive object is a placed copy of an object definition from the Data Editor: a chest, a door, a tree you can chop. It occupies whole tiles, blocks movement unless its definition says otherwise, and can be clicked by players. Objects are placed in Objects mode with the Object verb (or by ticking Interactive on a model) - that flow is described in Props and model painting. Region mode is where you find, inspect and delete the ones already on the map.
What an object placement stores, and what it does not:
- Stored per placement: the object id, the tile position (
position_2d), the facing (model_rotation_y), the height layer,interaction_type,interaction_radius,script_on_interact,is_persistentandcustom_properties. Height is never stored; it is re-derived from the terrain and height layer on load. - Taken from the definition: the model, scale, model offset and the footprint
tile_widthxtile_depth. Changing those in the Data Editor changes every map that uses the object.
Footprint rules, which the server applies identically:
- The object's position is its south-west tile; the footprint extends east (+X) by
tile_widthand north (+Z) bytile_depth. The model is drawn centred on the footprint, and its height is sampled at the footprint centre so large objects do not hang off slopes. - Objects only face the four cardinal directions. A facing of 90 or 270 degrees swaps width and depth, and the blue footprint tiles in the viewport update to match what the server will block.
Selecting an object with Select Entity shows its Name, ID, Size (the effective footprint), Tile, Open in Data Editor and Delete in the same properties panel spawners use. To swap a placement to a different object definition, select it in Objects mode and use the swap control in the viewport overlay.
Locations#
A location is a named set of tiles. The server exports it with its audio and environment settings, and the client applies fog and lighting overrides while the player is inside. Use locations for towns, dungeons, caves or any area that should feel or sound different.
Paint a location#
- Press Paint Location. The Locations tab opens with a Tile Selection section.
- Drag rectangles over the terrain to add tiles to the selection. Switch between Select and Deselect with the two buttons, or hold
Shiftwhile dragging to subtract.Ctrl+Aselects every tile on the terrain; Clear Selection empties it. The tab reports how many tiles are selected. - Under Assign location to selection, double-click a location type in the list. If the map already has a location with that name, the tiles are merged into it; otherwise a new location is created and selected.
- To add a name that is not in the list, press New Location Type..., type the name and confirm. Location types are shared by every map in the project and saved to
assets/data/locations.json(client) andserver/data/locations.json(server, with the script path).
Edit a location#
The Selected Location section appears once a location is selected (click it with Select Entity or assign tiles to it):
| Group | Fields |
|---|---|
| Identity | Name, Script (a server script from the dropdown, with New Script and Edit Script), Color (the tint drawn over its tiles in the editor). |
| Audio | Ambient Track, Music Track, Enter Sound, Leave Sound. |
| Environment | Fog Enabled, Fog Color, Fog Density (0-1, default 0.05), Fog Height (1-100, default 10), Ambient Light Color, Ambient Light Energy (0-2), Sun Light Color, Sun Light Energy (0-2). |
Delete Location removes the location and its tiles. Fog is previewed in the viewport as a box covering the location's bounding tiles.
Trigger zones#
A trigger zone is a polygon on the ground that records what should happen when a player enters, exits or stays inside it. The map editor loads and draws zones from regions.json (a red outline), but the current toolbar has no tool for drawing one. Create and edit trigger zones with the MCP tool define_trigger_zone (see below), which takes a tile rectangle or an explicit polygon plus trigger_type (on_enter, on_exit or on_stay), script_on_trigger, audio_to_play, one_shot, cooldown and enabled.
Walkability flags#
Every tile is walkable by default inside the map's active region cells. Flags let you block tiles the terrain itself does not: fences, water edges, the inside of a solid building, a cliff the slope check lets through. Flags are stored per height layer, so a bridge can be walkable on its layer while the ground under it is blocked.
Paint flags by hand#
- Press Paint Flags. Blocked tiles draw as an overlay and the Flags tab shows Unwalkable tiles: N.
- In the footer, set Brush Size (1-50 tiles;
Shift+ mouse wheel over the viewport also changes it), Brush Shape (square or circle) and the Height Layer to paint on. - Drag over the terrain. The footer toggle decides whether the brush marks tiles Unwalkable or Walkable; pressing
Ctrlwhile the brush is armed flips it, so you can erase without leaving the tool.
Each stroke is one undo step (Ctrl+Z).
Smart Navigation#
The Flags tab's Smart Navigation section fills flags on the current height layer from rules instead of brush strokes:
- Choose what matching tiles become: Paint matching tiles as Unwalkable or Walkable.
- Choose how rules combine: Match tiles meeting Any rule (OR) or All rules (AND).
- Tick the rules to apply:
- Height below / Height above a value in metres.
- Slope (deg) between a minimum and maximum (defaults
1to90). - Has prop / Has mesh, each with a coverage slider (default
25%) for how much of the tile a placed model must cover; the tile under a model's origin always counts. - Has NPC and Has object for tiles under spawner and object footprints.
- Terrain texture is a texture chosen from the dropdown.
- Press Preview to see the result as an overlay, then Confirm Changes to apply it. A confirmed fill is one undo step.
On save, blocked tiles are written to server/data/maps/flag_data/<map>.terrain as a list of (x, z, layer_mask) entries, where bit N of the mask means "blocked on height layer N". The server paths around blocked tiles. It also blocks the footprint of any interactive object whose definition has Blocks movement on, so you do not need to flag under those objects yourself.
Select, copy and delete in bulk#
Select Tiles drags a marquee over the map and opens the Selection tab, which summarises the rectangle (N tiles selected (W x D)) and the NPCs, objects and flagged tiles inside it:
- Delete Selection (or
Ctrl+X) removes every element in the rectangle after a confirmation. - Copy Selection (or
Ctrl+C) copies the spawners, objects and flags to a clipboard. - Paste (click to place) (or
Ctrl+V) arms the clipboard; a translucent preview follows the cursor,Q/Erotate it in 90-degree steps, and the next click drops it anchored at the clicked tile.Esccancels. - Clear Selection drops the rectangle without deleting anything.
For single elements: Delete Element removes whatever you click, the Select Entity footer's Insta-Delete mode does the same on every click, and the Delete button in the properties panel removes the selected element. To move a spawner, copy and paste it or delete and re-place it; interactive objects can also be dragged tile by tile in Objects mode.
Undo, redo and saving#
Placing and deleting elements, rotating objects, flag strokes and smart fills are all undoable with Ctrl+Z / Ctrl+Y. Edits mark the map tab with *; press Ctrl+S to save. A save writes regions.json and regenerates the server extracts, so the server always matches the last saved state of the map.
With AI (MCP)#
The same elements can be authored without opening the editor:
get_map_layout- readout and ASCII grid of every spawner, object, location and trigger zone, with free tiles.place_npc_spawner- add a spawner at a tile withbehavior,spawn_count,spawn_radius,respawn_time,wander_intensityandrotation_y.place_object_on_map- place an object definition at its south-west tile.define_location- create or update a named location from a tile rectangle or tile list; re-running with the same name edits it in place.define_trigger_zone- create or update a trigger zone from a rectangle or polygon.set_tile_walkability- block or unblock tiles on a height layer.remove_element- delete any element by its id.
The placement tools update regions.json, re-derive the server exports and refresh the open map in the editor; set_tile_walkability writes the walkability files instead, and get_map_layout only reads.