
Asset Manager
The Assets tab: browse imported files by category, import by dialog or drag-and-drop, tag and search, see what uses an asset, and pop out the browser.
10 min read
What the Asset Manager is#
The Assets tab (top bar) is the project's file library. Every model, sprite, sound, animation clip, skeleton and interface scene you bring into a game is registered here with a unique ID, copied into the right folder under assets/, and tracked so the editor can tell you where it is used before you delete it.
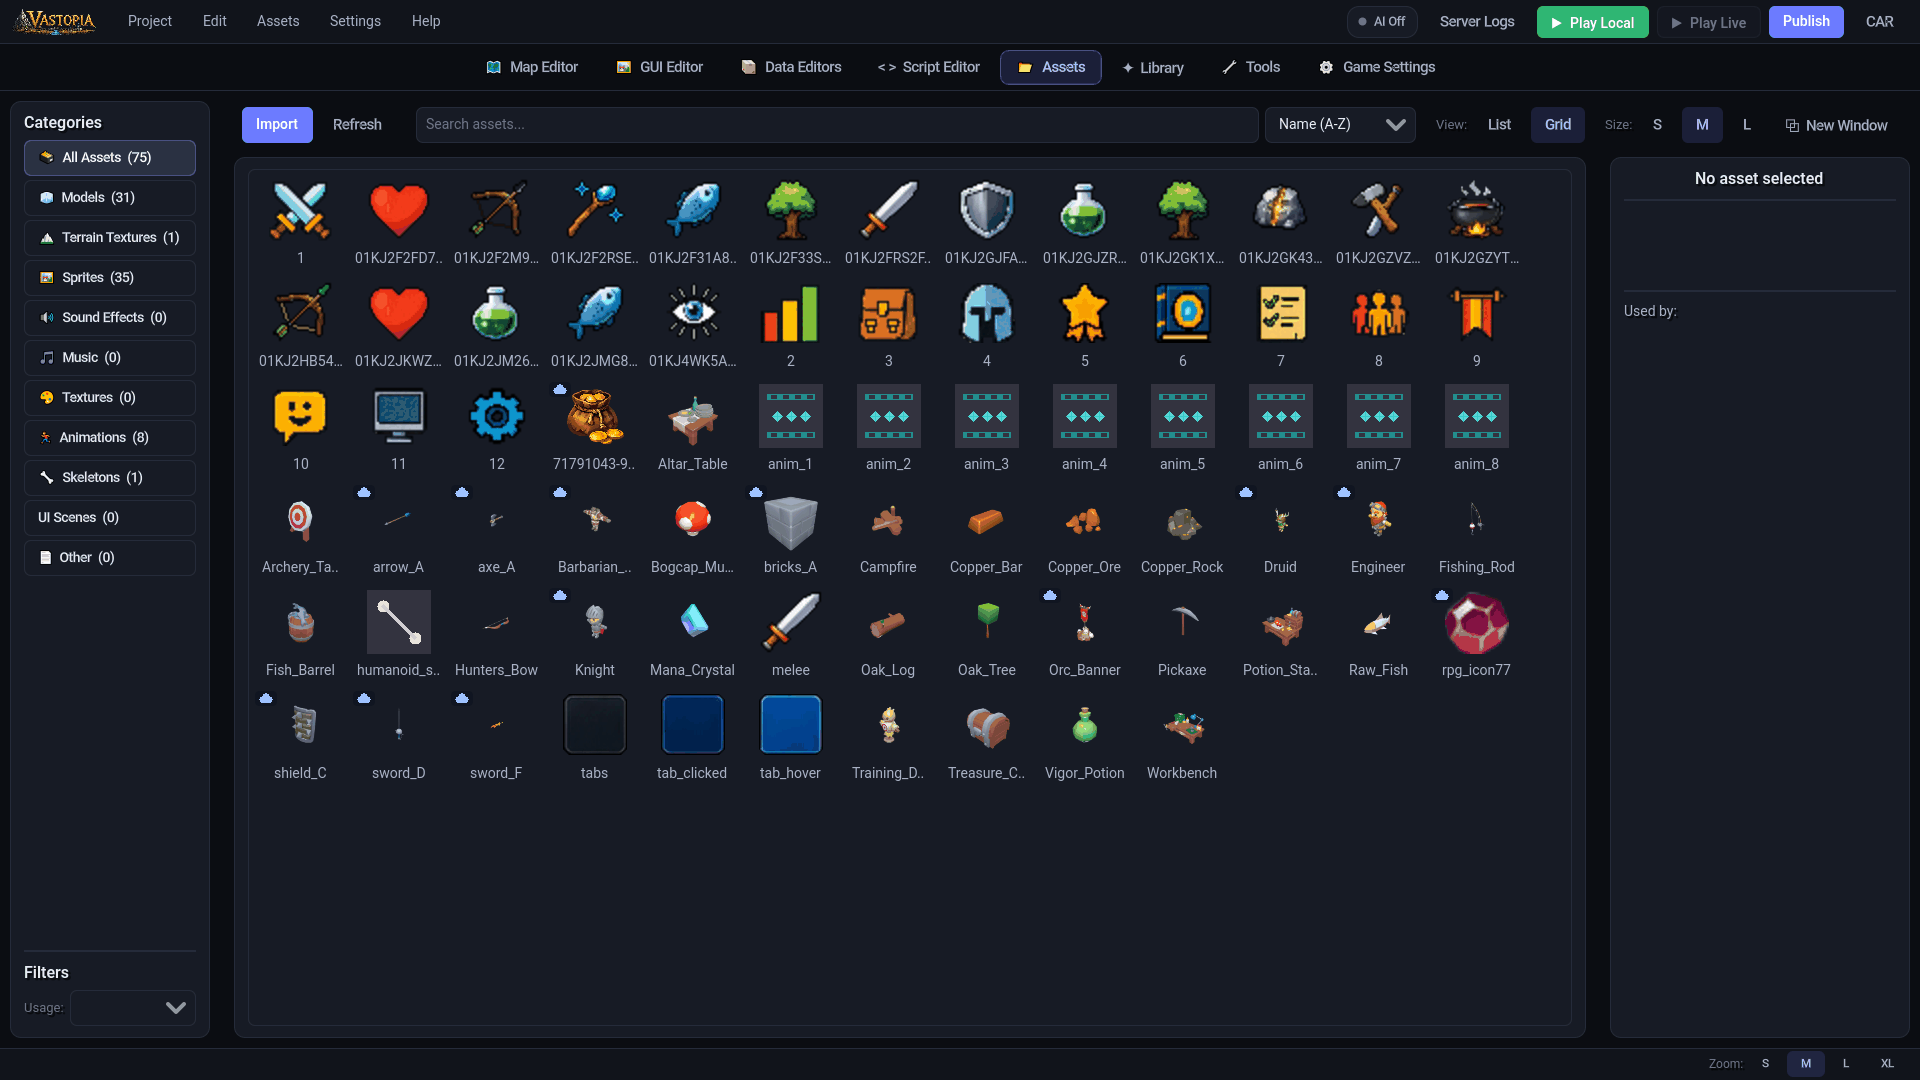
You do not have to visit the Assets tab to import things: dropping a model onto the Data Editor's create page, adding a prop from the Map Editor's Library, or importing a terrain texture all register the file here automatically. Use the tab when you want to organize, search, preview, tag, bulk-delete, or share what you already have.
Layout#
The tab has three areas.
Categories rail (left). One toggle button per category, each showing its item count. Below it, a Filters block with a Usage: dropdown (All, Used, Unused).
| Category | What it lists | Stored under |
|---|---|---|
| All Assets | Every registered asset in one flat grid | — |
| Models | The project's 3D model library (folders, linked external folders, placeable props) | assets/models/<id>_<name>/ |
| Terrain Textures | The terrain texture library used by maps | assets/textures/ |
| Sprites | PNG, JPG, JPEG, WebP, SVG images | assets/sprites/ |
| Sound Effects | WAV and OGG audio | assets/audio/sfx/ |
| Music | MP3 audio, plus .ogg imported through a Music picker | assets/audio/music/ |
| Textures | .tres / .res texture resources | assets/textures/ |
| Animations | Animation clips (.tres in anims/) | assets/anims/ |
| Skeletons | Skeleton scenes (.tscn in skeletons/) | assets/skeletons/ |
| UI Scenes | Interface scenes (.tscn) | assets/UI/ |
| Other | Anything that did not match a type | assets/misc/ |
Toolbar and grid (center). Import, Refresh, the Search assets... box, a sort dropdown (Name (A-Z), Size (largest), Size (smallest), Newest), View: List / Grid, thumbnail Size: S / M / L, and a New Window button on the far right. Under it is the asset grid for the selected category.
Preview panel (right). The selected asset's name, a preview (an image for sprites and textures, an orbitable 3D view for models and skeletons, Play / Stop buttons for audio), an info block (type, import date, pixel size, duration, format, file size where known), its tags, its project-relative path, and a Used by section.
How each category is browsed#
All Assets is a flat grid and is the only view where the sort dropdown and the Usage filter apply. In tile mode, names longer than 12 characters are shortened; hover a tile to read the full name.
Every other category is a folder browser: an All / Recent chip row (Recent shows the newest imports, flat, capped at 30 for the type categories and 40 for Models and Terrain Textures), a breadcrumb, a New Folder button, folder tiles and asset cards. Folders are purely organizational: they live in the library file, not on disk, so moving an asset between folders never changes its path or breaks anything that references it. Select several cards with Ctrl-click or Shift-click, then drag the selection onto a folder tile to move them. Right-click a folder for Open, New Subfolder, Rename Folder and Delete Folder.
Searching overrides folders: type in Search assets... and matches come from anywhere in the category, with folder tiles hidden. Search matches the asset name (and, in All Assets, the original filename too).
Import assets#
With the Import button#
- Open the Assets tab and select the category the file belongs to. The category decides what the file dialog offers and, for Models and Terrain Textures, which library the file joins.
- Click Import (or use the top bar's Assets ▸ Import Assets..., which opens the same dialog). Multiple files can be selected at once.
- Pick the files and confirm. The asset appears in the grid with its thumbnail.
The dialog filters per category:
| Category selected | File types offered |
|---|---|
| All Assets / Other | Images, 3D models, audio, resources, scenes, all files |
| Models | .glb, .gltf |
| Terrain Textures | .png, .jpg, .jpeg, .webp, .bmp, .tga, .exr, .dds |
| Sprites | .png, .jpg, .jpeg, .webp, .svg |
| Sound Effects | .wav, .ogg |
| Music | .mp3, .ogg |
| Textures | .tres, .res |
| Animations | .tres |
| Skeletons | .tscn |
| UI Scenes | .tscn |
The asset type is always detected from the file's extension, whichever category is selected: .wav and .ogg become sound effects, .mp3 becomes music, and .fbx / .obj models are converted to .glb first, which requires Blender (see Models). Importing from Models adds the file to the model library as a placeable prop; importing from Terrain Textures adds it to the terrain texture library. Those two libraries have their own pages: Models and Textures and terrain materials.
By drag-and-drop#
Drop files from your file manager straight onto the grid:
- Models category: drop
.glb/.gltffiles to add them to the folder you are browsing. Dropping a file that is already in the library reuses the existing entry instead of making a second copy. Drop a folder to link it rather than import it; see Linked folders. - Terrain Textures category: drop image files to add them as terrain textures in the current folder.
Dropping a model onto the Data Editor (the create cards or an open create page) also imports it, after the pre-import screen described below.
What happens on import#
- The file gets a ULID (a 26-character, time-sortable ID) and is copied into its type folder. Most types are renamed to
<id>.<ext>; 3D models keep their filename inside their ownmodels/<id>_<name>/folder, together with any.binbuffers and textures a.gltfreferences. - An entry is written to
assets/AssetLibrary.jsonwith the name, type, path, original filename, import date, tags and metadata (image dimensions, audio duration and format, model file size). - Models are converted to a self-contained
.scnin the background; see Models. - Eligible files (
.glb,.gltf,.png,.jpg,.jpeg,.webp,.ogg,.wav,.mp3) are queued for upload to your cloud library in the background; the copy is spooled either way, and the upload itself waits until you are signed in. Cloud-backed tiles get a small cloud badge. See Cloud library.
The pre-import screen for models#
When a .glb or .gltf arrives through the Data Editor (dropped onto a create card, or onto an open Item, NPC or Object create page), an Import Model window opens before anything is written. Use it to trim and shrink a model once, at the door, instead of shipping everything the source file carried.
- Left: a live, orbitable preview (left-drag to orbit, wheel to zoom) above the model's node tree. Untick a node to leave it and everything under it out of the import. Unticking a Skeleton un-skins the meshes that used it; unticking an AnimationPlayer drops embedded animations an item will never play.
- File General: Name, Category (None, Prop / Scenery, Interactable Object, NPC / Character, Item (equipment) — stored as a tag the cloud library browses by) and Max Texture Size: Automatic, 512 × 512, 1024 × 1024 or 2048 × 2048. Choosing a size downscales this model's textures now and the preview updates so you can judge the result. Automatic leaves the file untouched here; the normal import cap still applies afterwards.
- Bake (flat vertex color): switch between Original and Bake Textures. Baking replaces textures with flat per-vertex colors (much smaller, and consistent with a low-poly art style). Flat faces (solid color per face) and the Blend similar: slider tune the bake. What you preview is what imports.
- File Stats: source file size, model dimensions in metres, mesh and vertex counts, texture count with the largest edge and raw pixel weight, and animation count. The texture line drops as you lower the cap.
- Cancel leaves the page exactly as it was; Import continues to the create page with the processed file.
The screen is skipped for animation imports (its output is a processed copy that could strip the animation tracks) and for models that are already in the library.
Work with assets#
Select and preview#
Click an asset to preview it. In the 3D preview, left-drag orbits, right-drag looks around, middle-drag pans and the wheel zooms. For a model, a New: row under the path offers Item, NPC, Object and VFX buttons that open the Data Editor's create page with that model already attached.
Used by#
The Used by section scans items.json, npcs.json, objects.json, animations.json and vfx_database.json for anything referencing the asset, grouped by type (Items, NPCs, Objects, Animation Bases, Animations, VFX). Each entry is a button; click it to jump to that definition in the Data Editor. Terrain textures show Used by maps instead, and models additionally list the maps that place them as props or painted meshes.
Right-click menu#
| Item | Effect |
|---|---|
| Copy Path | Copies the asset's res://assets/... path |
| Copy ID | Copies the ULID |
| Rename | Changes the library name (the file is not renamed) |
| Edit Tags | Comma-separated tags, used for search, MCP filtering and the cloud library |
| Upload to Cloud / Retry Cloud Upload | Queues a background upload; shows On Cloud or Cloud Asset (linked) when already cloud-backed |
| Regenerate Thumbnail | Re-renders the tile thumbnail |
| Show in File Manager | Reveals the file on disk |
| Delete | Removes the entry and the file (a model's whole folder) |
With several assets selected the menu offers Upload N items to Cloud and Delete N items.
Delete safely#
Delete always asks for confirmation. If the asset is referenced, the dialog lists every item, NPC, object, animation or VFX that points at it and warns that those references will break. A missing model or icon does not error anywhere; the entity simply renders without it, so remove the references first, then delete. Deleting a cloud reference only removes the entry; the shared file on your machine is kept for other projects.
Find unused assets#
Select All Assets, set Usage: to Unused, and sort by Size (largest). Everything listed has no reference in the data files. This scan does not see map props: check a model's Used by maps line in the preview before removing it.
Assets menu#
The top bar's Assets menu duplicates the tab's main actions so they are reachable from any editor:
| Item | What it does |
|---|---|
| Import Assets..., Import 3D Model..., Import Texture... | Switches to the Assets tab and opens the import dialog |
| Asset Browser | Switches to the Assets tab |
| Asset Browser in New Window | Opens the pop-out window (below) |
| Refresh Assets | Reloads AssetLibrary.json from disk |
| Scan for Existing Assets | Registers files already sitting in the asset folders that have no library entry (safe to re-run; it dedupes by path) |
| Optimize Model Textures... | Caps texture resolution project-wide; see Models |
Pop the browser out#
Click New Window on the toolbar (or Assets ▸ Asset Browser in New Window) to open a second, independent copy of the Asset Manager that you can keep on another monitor while the Map or Data Editor fills the main window. Both copies read the same library and update together. The window remembers its position and size between sessions, and Dock Back inside it closes it again.
Files on disk#
| File | Purpose |
|---|---|
assets/AssetLibrary.json | The library index: one entry per asset with id, name, type, path, original_filename, import_date, tags, metadata, cloud_id, sha256 |
prop_library.json (project root) | The model library used by the Models category and the Map Editor: prop IDs, names, paths and folders |
assets/textures/texture_library.res | The terrain texture library |
.vastopia_upload/ (project root) | Spooled copies waiting for cloud upload; never packed or exported |
Everything under assets/ ships to players in the game's content pack; nothing under server/ is an asset. See Project structure.
With AI (MCP)#
The same library is available to an AI assistant through list_assets (search by name, type and tags; the only way to discover valid model_asset_id values), import_asset (the full editor import, including Blender conversion of FBX/OBJ), update_asset (name, tags, metadata), move_asset (relocate a file under assets/) and delete_asset (confirm-gated, and it lists dangling references). See the Tools reference.